
Strings Information
At Stoney End Music, we handcraft harps, dulcimers, and mountain banjos in Red Wing, Minnesota. The right strings are essential for the best tone, playability, and longevity of your instrument. This page covers string types, maintenance, replacement, and tips for keeping your instrument sounding its best.
HArp STrings
Banjo Strings
Dulcimer STrings
Replacements
Harp Strings
Materials & Types:
-
Nylon & Gut: Smooth, warm tone for melody strings.
-
Wire & Wound Wire: Provides bright, strong bass notes.
-
Bass Wires: Requires careful tuning; consult your harpmaker for replacement guidance.
Tuning & Pitch:
-
Follow your harp’s string chart to ensure correct pitch and gauge.
-
Proper tuning is essential for string longevity and overall tone.
Maintenance:
-
Wipe strings with a soft cloth after playing to remove oils and dust.
-
Keep your harp away from direct sunlight, heaters, and extreme humidity changes.
-
Check levers and tuning pins regularly for smooth operation.
Replacement Tips:
-
Always replace broken strings with the correct gauge and type.
-
Refer to our Replacing Strings Guide for step-by-step instructions.
-
Keep an extra set of strings on hand for emergencies.
Strings, Climate, & The Settling-In Period
Your new harp is a sensitive, living instrument, and it will naturally react to changes in temperature, humidity, and its overall environment.
As your beautiful instrument travels and starts to acclimate to its new home, it’s completely normal for the string tension levels to shift. Because of this, it’s possible—though not common—for a string or two to break within the first several weeks after your harp arrives.
-
Is this normal? Absolutely. Reputable makers and suppliers (like Dusty Strings and others we partner with) note that in about 10% of cases, a new harp settling into a different climate may pop a string or two during the first month. This is just a normal part of the adjustment process and not a sign of any defect in your instrument.
-
What should I do? If a string breaks, please simply replace it using the spare strings we include with your harp.
-
Our Promise: For any new harp purchased through us, we want you to feel confident. If you experience this climate-related breakage within the first month, we will replace those specific strings for you, ensuring you retain a complete backup set.
Your Abrasive Cord: A Simple Maintenance Secret
Every harp purchase from us includes a length of abrasive cord. This is a small, easy-to-use tool that can prevent a lot of frustration!
Repeated string breakage often happens right at the tuning pin because of a tiny, sharp, or rough spot on the metal. This cord is designed to smooth those spots out.
-
How to use it: If you notice a string breaks near the tuning pin, simply lightly thread and pull the abrasive cord through the string hole. This gentle polishing will smooth the surface and help prevent future breaks in that spot.
-
It’s a simple, safe practice, and a key part of routine harp upkeep!
Proper climate care—keeping your harp out of extreme dryness or humidity, and allowing it to adjust gradually—will always help minimize string issues. But remember, occasional breakage is a normal experience as your instrument settles into its new life with you.
Pros of a Low Tension Lever Harp
- Easier on the Fingers: The lighter tension requires less effort to pluck the strings, making it more comfortable to play for long periods. This is a significant advantage for beginners, children, players with hand or joint issues (like arthritis), or anyone with a lighter touch.
- Easier for Fast Playing/Ornaments: The strings have more “give,” which can make executing fast passages and ornaments (like those common in Celtic music) feel easier and more fluid.
- Mellow or Bright Tone: Depending on the strings and the harp’s design, low tension harps often produce a mellow, warmer tone or, conversely, a bright, clear tone. This sound quality is often preferred for folk and Celtic music.
- Less Risk of “Overplaying”: On high-tension strings, pulling too hard can sometimes produce a harsh or distorted sound. Low-tension strings are often more forgiving in this regard, though they can still be overplayed if technique is too aggressive.
- More Portable/Lighter Weight: Harps designed for lower tension don’t need the heavy-duty framing required to withstand the high pull of concert tension strings, often resulting in a lighter and more portable instrument.
Cons of a Low Tension Lever Harp
- Less Volume/Dynamic Range: Low-tension harps may have less projection and overall volume compared to high-tension harps, and they might offer a smaller dynamic range (the difference between soft and loud playing).
- May Sound “Tinny” or “Floppy”: If the tension is too low, or if the strings are overplayed, the tone can sometimes be described as too bright, tinny, or less rich in the bass register. The strings can also feel “floppy” under the fingers.
- Technique Development (for pedal harpists): If your ultimate goal is to transition to a pedal harp, starting on a low-tension lever harp may not adequately build the finger strength and callouses needed for the significantly higher tension of gut strings on a pedal harp. Switching later will require a steeper adjustment.
- Not Suited for Certain Music: The lower tension and different tone color mean they are less suited for traditional orchestral or certain classical repertoire that is typically written for a high-tension pedal harp.
Pros of a High Tension Lever Harp
- Powerful and Rich Sound: The higher tension allows the strings to transfer more energy to the soundboard, resulting in greater volume, projection, and sustain. This creates a richer, fuller, and more complex tone, especially in the bass.
- Greater Dynamic Range: You have a wider spectrum of volume—you can play very softly and very loudly without the tone collapsing or sounding “floppy.”
- Develops Pedal Harp Technique: The firm feel and higher string resistance closely mimic the feel of a concert pedal harp. Playing a high-tension lever harp is the best way to develop the hand strength, callouses, and technique needed for a seamless transition to the pedal harp later on.
- Crisper Lever Action: The tauter strings often lead to a cleaner, more precise engagement and disengagement of the levers, reducing buzzing or pitch issues that can sometimes occur with very slack strings.
- Wider Repertoire Suitability: The tone and volume make these harps better suited for a wider range of music, including pieces that mimic the sound of a small orchestral instrument, or music that requires clear, strong articulation.
Cons of a High Tension Lever Harp
- Harder on the Hands: The resistance requires more finger strength and effort to pluck the strings. This can lead to fatigue, callouses, or potential strain for beginners, younger players, or those with hand/joint conditions.
- Less Forgiving Technique: If your technique is not developed, high-tension strings can produce a harsh, slappy, or aggressive sound. The stiffness demands a more refined and controlled attack.
- More Expensive to Maintain: High-tension harps are often strung with natural gut strings, which are significantly more expensive and need to be replaced more frequently than nylon strings (typically annually to maintain tone quality).
- Heavier Instrument: To withstand the massive pull (tension) of the strings, these harps require sturdier, heavier internal bracing and construction. This makes them less portable and significantly heavier than their low-tension counterparts.
- Risk of Damage: Because of the constant, immense tension, the risk of a string breaking or the structure warping over many decades is theoretically higher, though quality harps are built to withstand this pull.
Dulcimer Strings
Materials & Types:
-
Steel, bronze, and nylon strings are commonly used.
-
Different materials affect tone: steel is bright, bronze adds warmth, and nylon is soft and mellow.
Maintenance:
-
Wipe the strings and fretboard after playing.
-
Replace strings showing signs of wear, fraying, or loss of tone.
-
Store in a stable environment to prevent warping or cracking.
Replacement Tips:
-
Use the correct gauge for your dulcimer model.
-
Consult your dulcimer maker or trusted suppliers for replacement strings.
Mountain Banjo Strings
Materials & Types:
-
Steel, bronze, nickel-plated, gut, and wound strings are common.
-
Material choice impacts tone and feel—bright, mellow, or rich.
Maintenance:
-
Wipe strings, neck, and head after playing.
-
Avoid extreme temperatures and humidity to protect wood and metal parts.
-
Inspect tuning pegs, tailpiece, and bridge for proper alignment.
Replacement Tips:
-
Replace strings gradually to avoid over-stressing the instrument.
-
Keep spare strings for quick replacements.
Additional Tips for All Instruments
-
String Charts & Reference Tables: Always follow your instrument-specific string chart for proper gauges and placement.
-
Environment Matters: Keep instruments away from direct sunlight, heat, or humidity fluctuations.
-
Stretching & Seating: New strings may need time and gentle stretching to hold pitch.
-
Extra Strings: Store spare strings safely for emergencies.
Specialty Strings
-
Harps: Wound bass strings, synthetic gut, color-coded options.
-
Dulcimers: Coated vs. uncoated strings.
-
Banjos: Strings designed for resonator vs. open-back setups.
Need Help?
If you have questions about which strings to use, how to replace them, or maintenance tips, don’t hesitate to contact us. Our Red Wing, MN team is happy to guide you and ensure your instrument sounds its best.


Replacing Harp Strings
It’s normal for harp strings to break from time to time, and learning to replace them is an essential skill for every harpist. Using the correct string type and gauge for your harp is crucial—refer to the string chart or list provided with your instrument. If you don’t have one, contact your harpmaker or a harp store to get the proper chart. Keeping an extra set of strings on hand is always a good idea.
Step 1 – Remove the Old String
Carefully remove the broken string from the back of the soundbox and around the tuning pin. For wire or metal strings, use pliers to avoid cutting your fingers.
Step 2 – Prepare the Tuning Pin
Harp tuning pins vary by type:
- Tapered pins (most harps): Slightly twist with your tuning key while pushing the pin toward the neck to ensure it’s securely seated.
- Threaded pins (used by Dusty Strings since 1998) or zither pins: Unscrew 3–4 turns before attaching the new string to prevent the pin from being too far into the neck.
Both tapered and threaded/zither pins are considered “through pins” when they go all the way through the neck.
Step 3 – Knot and Insert the String
- Wound and bass wire strings come with an anchor; other strings require a knot.
- Insert the string from inside the soundbox through the soundboard hole until stopped by the knot or anchor.
- Optionally, thread the string first, then tie the knot and pull it up through the soundboard.
Step 4 – Thread the String Through the Tuning Pin
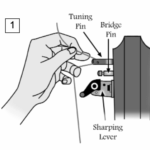
Pass the string through the tuning pin hole and any sharping lever if necessary. Make sure it’s on the correct side of the bridge pin.
Step 5 – Create Slack
Slack ensures proper winding and reduces the chance of breakage:
- Highest thin nylon or gut strings: ~2″ slack
- Bass wires and thicker wire-core strings: 2–3″ slack
- Nylon or gut strings over .036 gauge, or nylon-wrapped strings in higher octaves: little to no slack needed
Create slack by pulling the string to the side or adjusting through the tuning pin hole.

1a
1b
2
3

4
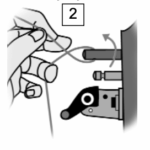
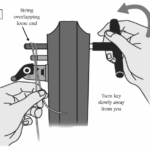
Step 6 – Wind the String
- Hold the loose end with your left hand.
- Use your tuning key with your right hand to wind the string over itself, securing it.
- Ensure the string stays in the groove and on the correct side of the bridge pin.
- For tapered pins, push the tuning key toward the neck as you wind.
- Continue until the string reaches the proper pitch.
Step 7 – Trim Excess String
Once properly installed and tuned, cut off the extra string above the tuning pin. For high strings, you may save the excess for future replacements.
Bass Wire Strings
Bass wires vary widely by maker. Replace them slowly and carefully, as mistakes are difficult to correct. Consult your harpmaker, their website, or Harp Center for specific instructions for your harp’s bass strings.